Hi Everyone,
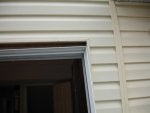
I am in the process of re-doing my kitchen and one of the projects that I am doing is replacing the exisiting sliding glass door. The old door is leaking and there is some damage to the subfloor. My question is on the exterior of the home the vinyl siding goes right up until the J-channel and the J-channel is against the old sliding glass window. The new replacment window that I bought ( A Pella 6' wide from Lowes). Has a large nailing flange that is around it. My question is can I cut this nailing flange down to install this new door or do I need to pull my siding (not what I want to do). Thanks for the help
CDM