DIY Home Improvement Forum banner
1 - 17 of 17 Posts

star987

· Registered
Joined
·
1 Posts
Discussion starter · #1 ·
Hi.
I am new to this forum.

I need help fixing leak to Delta Monitor 1400 series shower/tub faucet. After speaking to Delta's customer service, they will be sending me a new valve stem cartridge.

This is my first time replacing the cartridge. Pardon me if my terminology is incorrect.

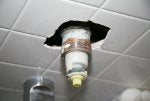
I am attaching some photos. Is the brass bonnet nut the greenish ring around the cartridge? If so, it seems impossible to remove. Delta's customer service told me to use some hot white vinegar to take some of the calcification off. I tried doing so for awhile but was not able to even make the part budge.

I've attached two photos with red arrows. Are the arrows pointing to the brass bonnet nut?

Any ideas on how to remove the bonnet?

Thank you very much. Any help is greatly appreciated.

Mike
 

Attachments

The bonnet can be stubborn. Be careful especially if the valve is an older style and has (3) 3/8 diameter soft copper connectors holding the round barrel looking portion to the rear part of the valve where the hot and cold 1/2" supplies connect. It looks like two separate brass sections connected together...and it is. You will need two good pair of channel locks (at least 12 inchers) if this is the case. One to hold the barrel from turning to the left (if the barrel rotates with the bonnet you crack the copper tubes) and one to loosen the bonnet. If you have the newer valve body (one solid mass of brass) one pair of channel locks will do. Try not to grip to tightly as to distort the bonnet into the barrel as you turn. A strap wrench may work also and perhaps a bit of WD40 since you are waiting anyway, but I have never had to resort to using it. Something with a good grip and less inward pressure is best.
 
The bonnet can be stubborn. Be careful especially if the valve is an older style and has (3) 3/8 diameter soft copper connectors holding the round barrel looking portion to the rear part of the valve where the hot and cold 1/2" supplies connect. It looks like two separate brass sections connected together...and it is. You will need two good pair of channel locks (at least 12 inchers) if this is the case. One to hold the barrel from turning to the left (if the barrel rotates with the bonnet you crack the copper tubes) and one to loosen the bonnet. If you have the newer valve body (one solid mass of brass) one pair of channel locks will do. Try not to grip to tightly as to distort the bonnet into the barrel as you turn. A strap wrench may work also and perhaps a bit of WD40 since you are waiting anyway, but I have never had to resort to using it. Something with a good grip and less inward pressure is best.
I have a related question to the previous post. If you have the bonnet off, how do you remove the rest of the valve?
 
In my experience, using any kind of pliers is going to cause you problems. When I get a really stubborn bonnet nut, I take a piece of emery cloth and warp it around the bonnet nut counter-clockwise, with the grit facing the nut, the smooth part facing out. Be sure to keep it pulled forward. Cutting the emery cloth down so its not wider than the nut will help ensure it doesn't cause drag on a different part of the valve.

Now grab the paper with your hands and turn (lefty-loosie, or counter-clockwise). This will allow you get good traction on the nut, and impart some good torque to it without squeezing it at all. The nut is thin and will deform easily under the squeezing pressure of pliers. This pressure will result in the need for more torque to break it free than if it were not there at all.

If this fails, I get a 2" fernco (looks like a short piece of water heater hose, with two hose clamps on it, made to fit the outside of 2" drain pipe). Put the fernco over the nut and tighten the fool out of the hose clamp.

Now, take your slip joint pliers and open to them fit over the hose clamp, and using the saddle on the clamp as a point to push on, turn the nut.

If it doesn't break free now... you can try putting the pliers on the nut directly, but my guess is you're going to be cutting that nut off and taking it to a plumbing supply house to order a new one.

If Delta hasn't shipped the parts yet, have them toss in a new nut. You just might need it.
 
BTW, JP has some great advice.. look at the back of that cartridge body. If its joined to the rest of the valve in the wall with the 3/8" tubing his referring to, you can make a royal mess of things.

I've marked up your photo. Hope that helps my post make more sense.
Image
 
One minor point

For the older model discussed, the cartridge doesn't "just pull out." You have to turn it 1/4 turn to the left then pull out. I almost pulled the whole valve through the wall trying to "just pull it out." :jester:

Other than that detail the instructions on this site are great. :thumbsup:

One more thing; I lost the screw that holds the handle on. In case you do the same it is a 10-24 1/2 inch screw.
 
Was having trouble with the faucet dripping. Just replaced the springs and seals and now it's dripping worse than before. Any suggestions?

Ryan

edit: Yes, I've made sure the bonnet connection is tight.
I am sure you've probably fixed this problem, but for the rest of the world asking the same question, I experienced the same problem. I pulled the cartridge, replaced what i thought was worn seats and springs. It still leaked. I spoke with a plumber who stated that sometimes the springs come a little to short and to flex them outward for a little more pressure in sealing the seats. Now it leaks more, The more I mess with it, the more it leaks it seems. Then I realized, it was the cartridge. The cartridge was separated down the middle. I'm not sure if its supposed to be sealed or just pressed together, but I pulled it open and there are three decreasing sized rubber seals inside. I carefully put a wrap or two of teflon tape around the seals to build them up again, make sure to keep the drilled holes in the metal clear of tape, and then pressed the halves back together. I then put to layers of tape over the o-rings on the ends that go into the sockets inside the wall. Reinstalled and its tight as a drum and works perfectly. I would say to check your cartridge for separating down the middle.
 
I found that using "Lime-Away" helped to make it possible for loosening the brass bonnet by hand while wearing a grippy rubber glove, although when I tried doing so before applying the Lime-Away it seems that I actually cranked too hard on the two copper connectors mentioned previously.

So, when I now turn on the water for shower/tub, water unfortunately spurts out from a new opening that I must have created when previously trying too hard to unscrew the bonnet from its cylindrical assembly. That explains why I sensed a lower pressure coming out of the shower, at least. Although, I found out about this symptom only after noticing that water was dripping through a light fixture on the ceiling just below this 2nd floor bathroom. It's been a fun cleanup.

Since replacing the entire valve assembly would require far too much damage to the walls and even require a new Delta fascia piece (since the new valve assembly does not accommodate my old one), I'm wondering if it might be reasonable to consider using consumer-level copper pipe soldering for repairing the small opening which appears to have been created from what I twisted slightly.

Thoughts welcome.

- wader
Unless you want to risk coming home to a flooded house I would replace the valve in the wall.
 
Thanks plumber Jim, I found that the valve might be accessible from a wall in the kitchen, behind above-counter cabinetry. So, damage and patching wouldn't be visible after the cabinet is placed back over where the work occurs.

It'll still be a job, but much better than going through the bathroom's tiled wall and cement backerboard, etc.

- wader
 
I had a similar problem, water spot on kitchen ceiling, poked it with a pen-knife and got a facefull of water. Found root of the problem was a 1400 series Delta shower valve had been dripping water for a year due to cracked joint between cartridge and two 3/8 inch hot and cold water leads. It's accessible from a panel in a closet, so I hacksawed it out and I'm going to replace the whole thing.
 
Hi I am in the process of replacing my cartridge and have a major problem. I used the advice above and was finally able to remove the bonnet after investing in a strap pliers, but not before first trying to remove it with regular heavy duty pliers. I think I twisted too much and now when I went to turn the hot side of the water back on, the water is spraying from the underneath part of the main housing assembly that the cartridge sits in! The cold water was turned back on with no issues. How would that leak or crack be fixed? Is soddering it the answer? Anyone else ever have this happen?
 
what is the yellow plastic peice called that is shownin in star987 pic

what is the yellow plastic peice called that is shownin in star987 picture of the valve stem. I need to replace that peice for two of my shower handles. Can anyone help me out by tell me what it is called and if any major home repair store has the part?
Thanks
Sunny
 
1 - 17 of 17 Posts