DIY Home Improvement Forum banner

How to finish this tile backsplash edge

12K views 40 replies 15 participants last post by  wrangler  
#1 ·
Hi all..

I recently (finally) finished my kitchen backsplash using glass tiles. First time trying to tile.

I went over the existing tile as I didn't feel like demo'ing and damaging the drywall.

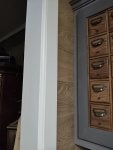
Any ideas how I can finish the edges? I thought I could create a grout edge but as you can see it looks pretty ugly. I couldn't use the metal edging because I thought it needed to go behind the tile to secure it.

Any advice is appreciated.
Image

Image

Image
 
#9 ·
Much like you see windows and doors. A flat piece of 1x or plywood attached where we currently see that taupe/mocha color would be wrapped around the corner with the casing. Like I've done here with this opening, but much narrower casing in your situation.
 

Attachments

#11 ·
How wide is the adjacent wall after the 90 degree turn?

What about finishing that wall with say different complimentary tiles with bullnose tiles?

Or the same tiles and now you can use a schluter edge on the far edge of that wall.

I wouldn't trim the schluter edging because once you bump into it it will come apart if not anchored it as designed.

Or just cut a piece of hardwood (or two or three depends on width) to cover that 90 wall. Have the wood come out flush with the tiles and caulk the joint on one side, and the other side flush with drywall, can even route the edges to make a nice transition.
 
#29 · (Edited)
You may be able to cut your current tile into about 1" wide strips and grind the edges to make a bullnose. (This might be dangerous if you don't have right tools.)
If you can’t grind it yourself you might have to go to a glass shop. They often smooth the edges of items they create such as glass table tops. I think they may call it satin edge.
 
#31 ·
Don't sweat mistakes! Turn them into something enjoyable!

A line of ceramic listello or matita that you like might look pretty cool. If one the exact width can't be found, perhaps put narrow cut strips of your tile against the wall and the listello on the outer edge to flush it up to the vertical.

The listello could be contrasting, complimentary or even colored glass. You can get really creative with different colors, patterns and even materials.

Or- Have a local pottery school make and glaze something of your design to fit.

And, in the olden days (like as far back as couple thousand of years ago) mosaics were often framed with hammered lead caps. You can use copper sheet, silver bearing tin sheet, lead free came or other safe material and have a fun DIY project.

Let your mind go free and you'll think of something to do that only you guys have!

Paul

PS: Funny listello story (at least funny to me):
I was tiling at my parents' home and asked my Made In Italy mother who passed by, to please hand me one of the matita. I was puzzled when she left. She came back a minute later and handed me a pencil. The literal translation of matita! Guess I should have asked for a listello. (Translates to "strip" in Italian. Who knows what I'd have been handed.)
 
#32 ·
Don't sweat mistakes! Turn them into something enjoyable!

A line of ceramic listello or matita that you like might look pretty cool. If one the exact width can't be found, perhaps put narrow cut strips of your tile against the wall and the listello on the outer edge to flush it up to the vertical.

The listello could be contrasting, complimentary or even colored glass. You can get really creative with different colors, patterns and even materials.

Or- Have a local pottery school make and glaze something of your design to fit.

And, in the olden days (like as far back as couple thousand of years ago) mosaics were often framed with hammered lead caps. You can use copper sheet, silver bearing tin sheet, lead free came or other safe material and have a fun DIY project.

Let your mind go free and you'll think of something to do that only you guys have!

Paul

PS: Funny listello story (at least funny to me):
I was tiling at my parents' home and asked my Made In Italy mother who passed by, to please hand me one of the matita. I was puzzled when she left. She came back a minute later and handed me a pencil. The literal translation of matita! Guess I should have asked for a listello. (Translates to "strip" in Italian. Who knows what I'd have been handed.)
Great story Paul and thank you for the suggestion
 
#35 ·
We had a weird situation by our tub where there was not enough room to put a Schluter strip all the way down. So it fit well all the way down to the top of the tub, but then there was only like less than an inch of wall next to the front apron of the tub to attach the Schluter strip. I cut off most of the backing with an angle grinder, leaving just enough to put construction adhesive on the back and then filled in the front with grout. Looks good and seems to be holding up fine.
 

Attachments

#37 ·
Maybe You'd Like This Look:
Perhaps a local glass shop would be willing to order (or cut) you some glass quarter round. It comes up to 10 feet long and is shaped like wood toe molding, but is glass.

It comes in many colors, widths (and heights if you don't want equal length flat sides). You can also get half-round. Frame the area, or just cover the problem side.

Gently cut it a tiny bit long with the wet saw. Using very wet emery cloth, polish and bevel the cut end on the last piece where that end is exposed. Install them with white mortar if the glass is clear or translucent.

Paul
PS: Tacky-Cool: Install a strip of LED light to cover the exposed mortar edge. Start a new trend!