DIY Home Improvement Forum banner

Flat Roof Issues

9.6K views 29 replies 8 participants last post by  jack45870  
#1 ·
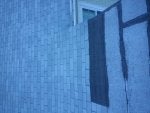
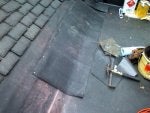
Hi all...have a almost flat roof. Its go just a slight pitch. About 17-20 years ago we redid the roof...new pluwood. And did a rolled roof applied with tar. Well some 30 years later its leaking. As you can see it also I also have to contend with a transition from the pitched roof to this basically flat roof.

So any suggestion what to go with? Rolled roof again? EDPM? How would I handle the transition.

Have some pics here also.

Suggestions are appreciated.
 

Attachments

#5 ·
I really dont want to go with EDPM, unless someone can give me good insight on hpw the transition happens fron EPPM to the roof tiles.

Can I go with a rolled roof again? Would I use some kind of recovery board first. The roolled roof which is shot now, doesn't look like it will all come up to get back down to the plywood.
 
#6 ·
I really dont want to go with EDPM, unless someone can give me good insight on hpw the transition happens fron EPPM to the roof tiles.
You tear everything off. Roof the low-slope section first, running the membrane of choice 18-24" up the steep slope, then come back down within 6" of the low-slope transition and start your shingles there. Doesn't matter what material you use, done the same way.

Please clarify what you are referring to as "rolled roofing" as that is a very generic term. If you are talking about nailing down 90# with mastic at the seams then I will just tell you to just figure out how much you will spend on that material. Then go to the bank and get that amount in $1 bills.
Now go up on the roof and nail down each of those bills to the roof because you will get about the same result as going through all the hassle of actually putting that crap down.

If you don't want epdm then look into SA membranes (self-adhering). GAF liberty or Certainteed Flintlastic are good brands. Good DIY products on a simple roof as yours is.
 
#7 ·
+1, the only thing I see here is that 4-6' section with the angle change looks from the picture may be a bit to low for shingles. I would run the low slope membrane all the way up to the main slope of the house. I don't know how visible that is but it may be a good candidate for a S/A modified roof. The detail is the same, tear those course of shingles off 12+" up the roof slope, install low slope roofing, reshingle down to 6-8".

From the pictures I believe this is the exact roof they invented the S/A modified for, no details except edge metal.

When you said "tar" I'm assuming you mean something in a bucket? There really shouldn't be a problem tearing it off, a bit more difficult maybe but it can and should be done.

Also if you use the S/A Modified use the nail base first, then you won't have a problem like this later on. That is why they made it.
 
#8 ·
Thank you OldNBroken & 1985gt for your thoughts.

OldNBroken...from what I remember way back when. It was a 36" roll, 18" had granular on it, 18" was just haevy felt. We put some kind of I think Henry brand roof tar down (from a 5 gallon bucket) 18" then rolled it down. sure we nailed it also. That left the 18" of black felt exposed which got the tar, and so on.

Boy I hope we didn't do 36" of tar all the way up...just can't remember, guess i'll find out. Given the choice would you do Liberty or Flintastic?

1985gt you are correct...in what you see there are almost 3 pitches there. and the "rolled roof" did go up under that section for the full 4-6'. Guess we did the 3 tabs to blend it into the rest of the roof.

I would also be interested in how the transition is made/looks like if I would use EDPM and transition at the slopes going up the 3 tabs.
 
#9 ·
I would also be interested in how the transition is made/looks like if I would use EDPM and transition at the slopes going up the 3 tabs.
Pretty much the same detail no matter what material you choose. You have to make sure you have plenty of membrane running up the steep slope to prevent wicking water and snow from getting above it and leaking under everything. Very critical no matter which low--slope material you choose.
 
#11 ·
Depending on roof joists, you don't have to tear out the old roof. Modified bitumen roll roof also comes with a roll of base sheet that you can nail over the old, basically gives you a new surface to work with. Use new drip caps for the edges. This may not give you the most smooth roof. Roof must be repaired if you have a pool here and there.
For the transition, I'd flash the drop off on the side with the best one piece flash you can manage. Roll roof should go up one width past where the slope changes, then start with ice shield where the shingles begin.
Rolls are heavy, so I'd precut them on the ground.
On sides, use extra width edging for more glue surface.
One way to secure the wider edging against the facia trim is nail down a metal tab before the edging then bend it up to hold it. Better than face nailing it.
 
#12 ·
I looked further into certianteed SA Membrane.

Have a few questions. I also gave them a call.

1. So the SA is either a 2 ply or 3 ply (3 ply with the midply)?
2. Midply gives it additional wararnty?
3. Warranty seems to only be 15 years with midply...I understand the warranty but I assume this will last longer?
4. Is Flintbond needed when it lays over drip edge?
5. I have a gutter the full length of the front of the roof. Since I'm going to go with nail base the first 18" infront get nothing as far as tar to seal it good, to prevent anything that gets built up at gutter
- Also, certainteed said to me you don't roll the base over the fascia...that just doesnt sound right.
6. Im going to try and rip off the old roof as best I can...do i need Yosemite Venting Base?


EDPM...seems I might get more life from this...what does the transition look like from EDPM to the 3 tab shingles? Like a big metal flashing?
 
#13 ·
I looked further into certianteed SA Membrane.

Have a few questions. I also gave them a call.

1. So the SA is either a 2 ply or 3 ply (3 ply with the midply)?
Yes

2. Midply gives it additional wararnty?

Implied warranty


3. Warranty seems to only be 15 years with midply...I understand the warranty but I assume this will last longer?

It's a material warranty, if you screw up the install no warranty

4. Is Flintbond needed when it lays over drip edge?

GAF says install the drip edge after base and adhere the cap sheet to the primed metal. I prefer to do it like a hop mop mod bit roof and install the roof, nail/screw drip edge, prime the metal and cap sheet 9.5" wide from the edge. mastic both the capsheet and metal and butter the stripping material (a 9" wide piece of cap sheet)


5. I have a gutter the full length of the front of the roof. Since I'm going to go with nail base the first 18" infront get nothing as far as tar to seal it good, to prevent anything that gets built up at gutter
- Also, certainteed said to me you don't roll the base over the fascia...that just doesnt sound right.

Keep your gutters clean! Nail base extends in to the gutter 2", mid ply or cap sheet is installed depending on if you do it the way I would or how they tell you to.

6. Im going to try and rip off the old roof as best I can...do i need Yosemite Venting Base?

No


EDPM...seems I might get more life from this...what does the transition look like from EDPM to the 3 tab shingles? Like a big metal flashing?
It's a toss up really, with EPDM you will need a coverboard over the wood deck and a bucket or two of glue. The transition will look exactly like EPDM since that is what it will be
 
#14 ·
Thanks for the quick response 1985gt.

If you extend the base sheet 2" over the gutter won't it rip pretty quick on the hangers?

If you put the EDPM up the sloped roof once you start coming down the again with 3 tabs you'll start puncturing the EDPM.

I guess what your saying is you have to go up the sloped roof so your EDPM will be up there also for 18-24". It will look ugly but is that correct? I must be wrong because the again you wouldn't just want to have one 3 tab overlap the EDPM...You would still run the risk of ice dams? Plus if you put 1/2 recover board up the steep slope for the 18-24" then when you come back down over it the shingles would be popping up.

Any pics you could share?
 
#15 ·
Thanks for the quick response 1985gt.

If you extend the base sheet 2" over the gutter won't it rip pretty quick on the hangers?

Back nail the gutter and remove the straps or remove the gutter completely.

If you put the EDPM up the sloped roof once you start coming down the again with 3 tabs you'll start puncturing the EDPM.

Correct you will be nailing the shingles through the felt then the EPDM


I guess what your saying is you have to go up the sloped roof so your EDPM will be up there also for 18-24". It will look ugly but is that correct? I must be wrong because the again you wouldn't just want to have one 3 tab overlap the EDPM...You would still run the risk of ice dams? Plus if you put 1/2 recover board up the steep slope for the 18-24" then when you come back down over it the shingles would be popping up.

In your case the EPDM would be very high 6' or so up that first slope then up the main slope. No risk of ice dams, with as high as it's built up it won't go under the shingles.

Any pics you could share?

This pic was taken of the old roof before it was replaced, we redid it in TPO and the shingles came down to the same level.
 

Attachments

#16 · (Edited)
Slate instead of shingles, but same look.
No, the insulation gets a tapered cut and butts flush against the sloped roof.
The 'cover' pic is just to give a side view. I leave 12"-18" of EPDM open to view and to let any snow and ice sit on the EPDM instead of shingles. Alternatively, I install first course of slate nailing high so lowest nails are about 18" up the roof. No ice dam issues that way.

The lower roof in the pic had a decent slope to it, so i went with Plan B. and high nails.

PS, the cover slip protects the roof EPDM from sliding ice or slate and is loose laid, with some water stop to glue it down so it doesn't flap in the wind. A close look will show the glue line which isn't continuous
 

Attachments

#21 ·
I take it you are going to use a S/A product then?

We use GAF or Certainteed. Don't know what one is better if any of them are better then one another.

.5" HD Iso is my preferred coverboard. Then Densdeck/ secure shield, wood fiberboard is the last on the list unless its a BUR roof.

If you use a coverboard remember to get longer cap nails for the base sheet. Or you could use the S/a Base sheet if using a coverboard also. The insulation would have be fastened down with 3" plates and screws either way.
 
#22 ·
Well we are going back at this tomorrow, If it does not come up I guess everyone is saying somekind of board is ok. I just don't want this stuff telegraphing bad.

The other part is would you guys install the midply on a residential application? Certainteed says it only adds 3 years warranty.
 
#23 ·
It will come up, just depends how long you want to work at it. :)

Some of it will telegraph through, .5" HD ISO wont as much as say fiberboard.

An extra ply is not a bad idea, Although I'm bidding one right now with just a base and a cap, although on this project it's turning out to be most costly then a EPDM.
 
#24 ·
Three plies are better than two. Warranties are worthless. Do three plies, or even 4 and be worry free.
I forget the pattern, but I think you start with a 12" piece for 1st. ply,
then cut 18" off the first sheet in the 2nd. course,
First cap/granule sheet is a full sheet.

DO NOT start each course with the same size sheets. The laps will be huge and block water-flow if you do, and possibly lead to an early failure.