DIY Home Improvement Forum banner

Best strategy for installing Schluter trim at the tile edge for my shower?

1 reading
17K views 30 replies 6 participants last post by  zpwr  
#1 ·
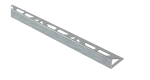
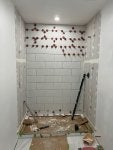
I plan to finish my shower tile with a Schluter type L trim piece. I will be installing one continuous piece on either side of my shower from my finished tile floor to the ceiling. I plan to leave a 1/8 gap under the trim off of the floor as I assume it shouldn't be resting on it. I plan to overhang my tile 3" past the edge of the shower pan. I will be using a laser to keep everything straight.

What is the best strategy for newbie who will be tiling slow up the wall?
Do I set the trim piece on the wall before I tile? If so, what is the best way to do so?

Thanks.
 

Attachments

Discussion starter · #3 · (Edited)
Install the Schluter trim first so it will be perfectly plumb and in the right place. Then run your tile from it to the inside corner wall. You are using a 1/2 1/2 break. On 24" tile, I like to use 1/3 break, but it is a preference. Start your tile with a full one, then a half one, etc. The cut at the wall will be whatever it is.
The wall tiles are roughly 18 x 7.5 in as opposed to the floor which were 24 x 12 in. I probably could have stuck with a 1/3 offset but chose not to for some reason on the walls. Don't recall why honestly. Here is what the pattern will look like for the wall and tile size.


Any suggestions on how to install the Schluter trim? Mortar? Screws?


If using mortar to set it, I obviously don't want to have any build up on it as to cause issues with tiles further up the wall since the mortar holding the trim piece would have been setup already by the time I get up that high.
 

Attachments

Discussion starter · #5 ·
So I think I have my strategy in place to do the tile and trim install. However, I think the 3/8' trim is going to be too thin or narrow once I install this tile using a 1/2" trowel. Meaning, I'm pretty sure the tile will be proud of the trim once I add mortar.

The trim comes in either 3/8" or 1/2". The tile shop sold me 3/8" pieces.

My tile is 7.8 mm thick which is .31 inches. 3/8' is .375" which leaves me roughly a 1/16" for mortar. I feel like 1/2" L trim would be a safer route especially when taking into account the trowel size and slight imperfections in the drywall surface where the trim will be attached. Ideally you want the tile flush with the trim but I would rather have the trim proud of the rough tile edge as opposed to having the tile edge proud of the trim.

Is the 1/2" trim the way to go or am I missing something in my logic?

Image


Image
 
Discussion starter · #7 ·
That's not Schluter. Also, a 1/2" trowel size it normally too big for that tile. Otherwise, follow chandler's advice.
Thanks. I meant Schluter like. These were the ones that were available at the tile shop. Tile shop guys said to use that trowel for large format tiles. They stated that large format tiles are anything longer than 15”.

I ended up doing one wall yesterday. It was a long day for me just to do one side. I’m super slow at this.


Image


Image
 
Discussion starter · #10 ·
Well, that’s good to know. Honestly, I’ve been struggling with the half-inch trial for those tiles. My walls are actually flat. I spent a lot of time making the walls, plumb and flat.

I could try a smaller trowel on the last remaining wall. 1/4 x 1/4 x 1/4 then?
 
Discussion starter · #12 ·
One more thing. I have been using their Ardex X5 for all of the tile work so far. E.g., walls, floors and uncoupling membrane.

I obviously don't have a lot of experience with tiling but the mortar seems to start out creamy or batter like but starts to stiffen up within the hour. I occasionally mix it with a trowel and that seems to help a bit. I am no longer using any of it after about 2.5 hrs. They say that the mortar has a 3 hr pot life but that isn't happening in my environment.

I'm just expressing some of my frustrations but this is when I wish I could watch a pro mix and apply thinset to the walls. No matter how much YouTube I watch, I find it hard to get the mechanics down.

Any thoughts or suggestions regarding mortar would be helpful. Thanks.
 
Discussion starter · #14 ·
It's hard to say without watching. I normally haven't liked the installation products Tile Shop sells, but I know Ardex has a good reputation so I'm sure it's fine. It's OK if you want to use a little bit more water than they specify. Are you slaking it? I looked at Ardex directions and I see they don't specifically call it slaking - not sure why - but they are implying the same thing. Mix it up, then let it sit for about 10 minutes, then mix it some more. That should help. But in any case, if you find it's not giving you the right pot life, just mix smaller quantities at a time. Also use cold water to mix it.
Understandable. My water ratio has always been around their 75% range. Meaning if a 40 lbs bag uses 6-7 qts of water, I have used 6.5 to 6.75 qts. I only used a full bag once for the floor and that was rough. I have been using 10 lb portions for the walls. So I start out with 1.5 qts to mix and have 8 oz on the side. After two minutes I would add water from the 8 oz container. Maybe 4 -6 oz but never all of it. Not sure why to be honest. It never seems to loose.

Anyway I will pick up another bag of the X5 since I have been using it. Next time I will try Schluter's thinset or even Multimax Lite from Laticrete.

Regarding slaking, I tried it once when I did the floor but it's been so long ago I am not sure if it made any difference. I only tried that since most videos did so. I could not find the concept of slaking in any of Ardex's information on the bag or online. I specifically asked a manager at the Tile Shop and he said that there is no slaking required with their product as compared to most other competing products. So, no, I do not slake it. I just mix for 2 mins, then add any additional water and mix for another minute and then start working.
 
Discussion starter · #16 ·
Well, like I said, it's kind of hidden or implied in their instructions.

"Mix thoroughly for approximately 2 to 3 minutes to obtain a lump-free mix.... Just prior to application on the substrate, the mixture should be stirred again to ensure a creamy, smooth, lump-free consistency."

So if you do that, you'll mix, there will be some (unspecified) pause or delay, and then a remixing. That is basically slaking.

If you want to try a different thinset, Schluter All Set is very good. But really no one is walking on these tiles. They just have to stay on the wall, which isn't a big challenge for any thinset. It's more important to get full coverage (or as full as possible), and that's always easier with thinset that is a little looser. Basically because it's easier to compress the ridges and get that tile flat on the wall. Also, looser thinset sticks better than dryer thinset. I'd rather have better adhesion and full compression with a lower quality thinset than weak adhesion and a lot of air pockets with a higher quality thinset.
This information is very helpful especially after actually tiling. I appreciate the response.

I think the tiles look good for my first time doing a job of this size but there are some imperfections for sure. There is one tile what some more than acceptable lippage. I am expecting perfection but it is not probably realistic based on my experience level. Another issue I am running into after I collapse the ridges (or at least try to), is once slide the tile in place I am getting mortar in the joints. This makes my process slow as I try to remove as much as possible from the joint while tiling. This also adds a considerable amount of time the next day as I have to scrape all of the excess mortar between the tiles.
 
Discussion starter · #19 ·
I've pretty much given up and use tile levelers now, except for smaller tiles.
Tile levelers are great. I am probably using too many but so be it. I am sure this goes without saying for you guys, but obviously they are not a silver bullet and still require good tile placement into the mortar. The tile with the lippage was due to the fact that I had planned to finish installing 3 rows when I started on the back wall. Since I was not going to be leveling with the next row that night, I never checked the tiles for plumb and hence the problem was found the next day when I continued on with tiling.

I suppose all these things are obvious only when you have been doing this job more times than once.