DIY Home Improvement Forum banner
1 - 13 of 13 Posts

Thunder Chicken

· PE Mechanical Engineer
Joined
·
653 Posts
Discussion starter · #1 · (Edited)
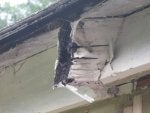
I've got a 1942 cottage that I am trying to fix up. The roof has exposed 2" by 4" rafter tails under the sheathing and had fascia nailed to the ends, onto which the gutter was screwed, no soffit.

The ends of the rafter tails have been re-nailed a lot over the years and the last gutter installation was not properly flashed, so they all have a bit of end rot. Best ones are pretty solid until the outer inch or so, but a couple of bad ones are rotted 2-3" from the end.

I'm not planning to take up the roof or sheathing at this point, but I am looking for some sensible ways to fix these ends and make them look neat. I'm worried about cutting them because right now this isn't a structural problem, so whatever I don't want to make the problem worse.

Any suggestions on repair methods for this? I'll get up some pictures of the rafter ends tomorrow when the sun is out.
 
Normally if they are in a soffit box, you can just sister them up, cut off the rotted sections, and be done with it.

Here, that will leave a bit of an issue on the visible side.

You could do a little half lap rabbet but you would see it from the underside and it would require fastening together.
 
Discussion starter · #3 ·
Here are the pics as promised. Most of the tails *could* probably be renailed as they are, but one is pretty bad and definitely won't take a nail unless the nail is 4 inches long. While I've got it torn apart I'd like to see what I can do. This is all going to get repainted, and this isn't the Taj Mahal, but if anyone looks at it and sees the repair, I'd like them to say, "yep, neat job, did it as right as they could".

Sistering would be functional, but I wasn't planning on closing in these with soffits. If I did these I would have to do the whole house which seems silly.

How would I go about cutting rabets on these?
 

Attachments

Discussion starter · #4 ·
Here's another shot showing what I've got. I pulled the rafter blocking this morning and scraped most of the paint and loose stuff out. The rafters are 16" apart.

I'm sheathing the wall up today. Another dumb question, but what is the "proper" way to close up the rafter bays? I'm pretty sure what was there was not proper.
 

Attachments

Discussion starter · #5 ·
After a little Googling, I understand this is a birdsmouth cut rafter. The pics that I see online show that the wall sheathing should go all of the way to the top of the wall and the birdsmouth would go over it all. Since that wasn't done here, I assume notching the sheathing up around the rafter is the next best way to go?

I'm going to get moving on this sheathing just because I don't want the squirrels to steal my insulation, but I'll just tack it up so if I have to get access to the rafter I'll be able to take it off.
 
Discussion starter · #6 ·
I'm thinking of cutting the rafter tail off vertically flush with the wall framing, cutting a new tail, and then fastening it with some tie plates on either side and some screws through the roof sheathing under the first course of shingles. With the sheathing and blocking put around it it should be pretty solid and neat looking. I can't think of a better way.

Unless anybody has an objection...going once,...going twice...:laughing:
 
That will work if you don't want/need the soffit blocking screened holes for attic ventilation. No plates required, just add new tails extending 16" into the attic, ripped same size as height above seat-cut, with full width on exterior. 1 through roof decking after lifting shingles, 2 staggered in the side of each dummy rafter. None on exposed sides, add blocking, it won't move. Sold...

Gary
 
Discussion starter · #8 ·
I think I'm going to do it the way that I specified, just so I don't change the distance between the rafters. Only 2 really need to be replaced.

The new wrinkle it that they are apparently older 2" by 4"s, actual dimension 1-1/2" by 3-7/8", square corners. I think I can get a nominal 2" by 6" ripped to the right dimension.
 
What does the rest of the house look like as far as rafter repair? How difficult would it be to close in the soffit on the gable ends? Looks like you need to remove the rest of the blocking to make the repair anyway and spend some time scraping all the old paint. Personally, I'd sister a 2x on each side of the bad rafters and close in the soffit before the siding goes back on then you have all new material to paint which would look much better in the end. I'd also add a simple birdbox on the gable end.
 
Discussion starter · #10 ·
The rest of the rafter tails around the house look good, just need some paint. This particular stretch is bad because some previous owner tore apart this wall and put up gutters but didn't flash anything.

I hear you on the soffits. Right now I'm really working just to undo the damage done by the previous idiot, catching up on deferred maintenance, and generally stabilizing this house. Soffits might happen later when I get caught up and can start thinking home improvement, but I'm not there yet. For a little cottage it seems I keep finding nasty surprises every time I turn around.
 
May want to install some drip-edge flashing while working on that side...to stop De-javu.

Gary
 
Discussion starter · #12 ·
May want to install some drip-edge flashing while working on that side...to stop De-javu.

Gary
Yep, already got the drip-edge :thumbsup:. $3 of flashing would probably saved a lot of this mess in the first place. All the stuff I fix in my house seems to be something that could have been prevented by purchasing something costing $2-$3 and spending an extra 30 seconds installing it.

A friend is ripping a 2x6 down to the proper width for me tonight so I can fix those tails, then I can start putting all back together.
 
Discussion starter · #13 · (Edited)
OK, got the tails in (not a big job but I'm crowing anyway :laughing:). Replaced 2 of the tails using nailing plates, notched and installed the sheathing. Spray painted everything (brushing around all those nails did not excite me, so general purpose gloss white Rustoleum it is!)

I tried taking a piece of 5-1/2 trim board and notching it for blocking; I got it in but the board split in a dozen different places. I replaced it with a piece of Azek (overkill, but it is bendy, doesn't split, looks good. I pulled out my credit card and said "**** it"). I nudged it up into place today. I think with some caulk it will look pretty good.

I have to get a 5" trim board for the corner of the wall, then I can tar paper and shingle. We had a sales tax holiday this weekend in MA and I couldn't find a 8' length of 5" trim to save my soul this weekend. Everybody else must be repairing their rotten shacks too. :laughing:

Photo shows the drip edge - I just jammed that in quickly last night because of hellacious T-storms that passed through. I have to wait to get the fascia on as I need to nail in the blocking and need a decent hammer swing. I hope to be able to get everything squared up by Tuesday.

Thanks all!
 

Attachments

1 - 13 of 13 Posts