Hello all,
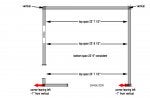
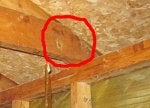
I've got a garage wall that is starting to lean on one side and it's roof line is starting to sag. The lumber is in good shape, no termites or excessive weather damage. I'd like to put it in check and rectify the situation if possible and extend the life of the structure. Do you have any ideas as to what I can do to shore it up?
I feel that it will be a combination of pulling the wall into plumb and sistering the rafters and trusses? If so, what would be the correct order to do that and how?
I'll see if I can attach a few images to the thread for reference. Thanks for your ideas! This site is amazing!


")